Sunday, August 28, 2011

Gluten Free Banana Bread


Only way to deal with over ripened bananas - banana bread!  The photo above was baked with brown gluten free flour and it turned out nicely. It's equally as good with plain white gluten free flour as listed below.


250g plain gluten free flour
1 teaspoon bicarbonate of soda
pinch salt
115g butter
115g dark brown soft sugar
2 eggs, beaten
1/4 teaspoon Xantham gum

Preheat the oven to 180 C / 350F. Lightly grease a 23x13cm loaf tin. In a large bowl, combine all dry ingredients. (except sugar).

In a separate bowl, cream together butter and brown sugar. Beat in the eggs, one at at time until batter is light and fluffy. With a spoon add mashed bananas. Stir banana mixture into flour mixture and stir just to moisten. Pour mxture into prepared loaf tin.

Bake in preheated oven for 60 to 65 minutes, until a knife inserted into centre of the loaf comes out clean. Leave to cool in tin for 10 minutes, then turn out onto a wire cooling rack. 

Saturday, August 27, 2011

Gluten Free Yorkshire Puddings


There's nothing better than digging into a delicious roast beef dinner, complete with potatoes, veggies and yorkshire puddings smothered in gravy!  If you are lucky enough to have left overs puddings, they are great the next day filled with thinly sliced beef and mustard.

These gluten-free yorkshire puddings are easily mistaken for regular ones. It's near impossible to tell the difference. The key is the blend the heck out of it and make sure the mixture is at room temperature when you are ready to bake. I recommend making up the batter a couple hours ahead of time, let sit out on the counter and then give them one last blast in the food processor right before pouring into the hot pan.

1 cup gluten free flour (less 2 TBSP)
2 TBSP corn flour
1 cup milk
3 eggs
1/4 tsp Xanthan gum
Pinch of salt
Vegetable oil or goose fat

In a food processor or blender, blend flours, milk, eggs and salt.  Mix for one to two minutes on high.  Set aside and let reach room temperature.

Heat oven to 220ºC/Fan 200ºC/425ºF/Gas 7.

Place enough oil/fat in the bottom of each muffin tin to just cover the bottom. Place the tin in the hot oven until the oil is piping hot. CAREFULLY remove the pan from the oven and quickly pour in the batter until it fills half way up each of the tins. Quickly return to oven and let bake. Do not open the oven door for at least 20 minutes our your muffins will drop.

For large yorkshires bake for 35/40 minutes and small ones for 15/20 minutes.

Monday, August 15, 2011

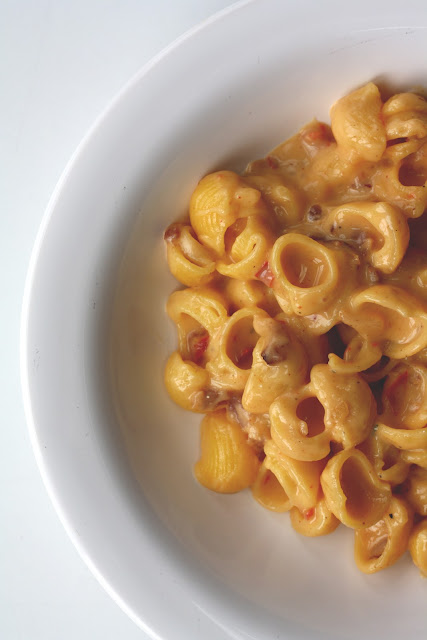
Grown up Mac and Cheese - Gluten (but not Calorie) free!


This delightful 'adult' version of Mac and Cheese is just as comforting as the version you ate as a kid.  The smoked paprika adds a hint of smokey goodness and the sharp cheddar, along side the beer, make it packed full of flavour. 

2 tbsp white onion, chopped
1 clove garlic, chopped
1/4 red pepper, chopped
pinch fresh thyme
2 slices bacon, chopped
1 1/2 tbsp unsalted butter
2 tbsp all-purpose flour
1 1/4 cup milk
1/4 cup gluten free beer (can substitute with milk)
1/2 tsp smoked paprika
pinch cayenne pepper (optional)
salt (to taste)
white pepper (to taste)
salt for pasta water (1 tsp per 1 L of water)
400 grams torchietti pasta (about 13 ounces)
4 ounces aged cheddar (2 cups)

Heat a heavy sauce pan over medium heat and add the butter and bacon. Let the bacon cook until the fat renders (melts). The bacon should almost be cooked but not browned. Then add the onion, garlic and red pepper and gently cook, turning the heat down to medium-low to avoid any browning. Cook until the onion and garlic begin to soften and release their flavors. Then season with the paprika and a pinch of cayenne pepper for extra heat, if desired.

Next, sprinkle the mixture with the flour and stir to form a roux. Let this cook gently for about 2 minutes, being careful not to let the bottom scorch or burn. Then add the beer and stir to combine. Add the milk a bit at a time to temper it. This will prevent lumps from forming. Continue until all of the milk has been incorporated. Finally, add the thyme.

Turn the heat up to medium, if needed, to bring the sauce up to a gentle simmer. Once the mixture starts to bubble, reduce the heat to low. Stir occasionally and let cook for about 10 minutes or so. While the sauce cooks, go ahead and cook the pasta

To cook the pasta, add the salt to the boiling water and stir. Then add the pasta and stir to prevent it from sticking together. Cook for about 10-12 minutes, or according to the instructions on the package. For this dish, the pasta should not be al dente, as you want a soft texture.

While the pasta cooks grate the cheese and stir the sauce occasionally. Test the pasta and once it’s just cooked through, reserve a bit of the cooking water (in case you need to thin the sauce out later).

Next, turn off the heat and add some cold water to the pasta. This will slow the cooking process so you can finish the sauce.

To finish the sauce, turn off the heat and temper in the grated cheddar by adding it a little bit at a time. Stir each time until the cheese melts. By adding a bit of cheese at a time, you prevent the sauce from splitting. Season the sauce with salt and pepper to taste.

To finish the dish, drain the pasta and return it to the pot. Then pour the sauce over top and gently fold everything together. If the sauce seems a bit too thick, you can thin it out with a bit of the reserved pasta water. Taste for seasoning, serve immediately and enjoy.

    Sunday, August 14, 2011

    Gluten Free Beer Battered Fish and Chips


    If you miss the crispy saltiness of fish and chips, suffer no longer. This is a super recipe that beats most fish and chip restaurants you'll find around town.  The rice flour adds an extra crispy dimension and the beer batter adds a nice kick of flavour.  

    Ingredients

    Vegetable oil, for deep frying
    1 1/2 cups rice flour
    1 tsp baking powder
    2 teaspoons salt, plus more for seasoning
    1/2 teaspoon freshly ground black pepper, plus more for seasoning
    1 (12-ounce) bottle of gluten free beer such as Estrella DAURA*
    1 large egg, beaten 
    2 (8-ounce) cod or haddock fillets, cut in 1/2 on an angle
    1/2 cup more rice flour, for dredging
    Apple cider or gluten free vinegar, tartar sauce and lemon for serving

    *Can also substitute beer with equal amounts of soda water.

    Directions

    Heat 3 inches of the oil in a deep fryer to 375 degrees F.  Or alternatively, you can use a deep fat fryer if you have one.

    In a large mixing bowl, combine the 1 1/2 cups of rice flour, baking powder, salt and pepper. Combine beer and egg and pour into the flour mixture. Whisk to a smooth batter. It should not be too thick - if it looks like pancake mix, thin with a bit more beer.  Should be the consistency of heavy cream.

    Spread the rice flour on a plate.  With paper towels, pat the fish to ensure it's dry. This is important or the flour/batter mixture will not stick. Dredge the fish pieces in the rice flour and then dip them into the batter, letting the excess drip off.

    Carefully lower the battered fish into the bubbling oil. Fry the fish for 4 to 5 minutes until crispy and brown, turning over if using less oil.  Remove from oil and place fish on paper towels; season lightly with salt. Serve with your favourite chips/fries and toppings.

    A bit more about....

    Estrella Daura Gluten Free Beer -
    Voted best beer in the World suitable for those suffering from Gluten intolerance and/or Coeliac.

    This award has been given in recognition of the quality of Daura, which retains the same taste and properties as tradition beers, as well as having gluten levels of less than 6 ppm, much lower than the 20 ppm recommended for people with coeliac disease by the World Health Organisation.


    Sunday, August 7, 2011

    Mango Crab Roll


    My first experience with this dish was in Hawaii at a restaurant called Sansei.  I loved it so much, I returned to the restaurant at least four times during my seven day stay.  I searched high and low for the recipe and alas, finally found it.

    I'm warning you now, Mamanori sheets are pretty difficult to track down but if you find them, it's well worth the effort.  Keep in mind though, that some of the colors (not all) contain traces of gluten so be sure to do your research before you buy.  You can also use regular nori sheets as these can be found at most supermarkets in the Asian section.

    Ingredients:

    • 3 - 4 cups blue crab meat
    • 1/4 cup gluten free mayo
    • 4 large (8 small) sheets mamenori or nori
    • 1/2 cup cooked white sushi rice (or other sticky type rice)
    • 8 cups loose mesculin greens
    • 2 cups diced mango
    • 1 cup dry roasted peanuts (unsalted preferably)
    • 2 cups fresh cilantro (coriander)
    • 1 cucumber, sliced thinly
    • 1/2 cup Thai vinaigrette (see below for recipe)
    • 4 tsp sweet Thai chili sauce

    Directions:

    In a mixing bowl, combine crab enough to bind and reserve for later. Lay mamenori on a clean flat surface, lace cooked rice 1/4 inch from the top of the mamenori for binding the roll. Lay mesculin mix on mamenori, lace crab, mango, peanuts and cilantro in the middle of the roll and firmly roll with a bamboo sushi roller. 

    With a sharp knife, cut roll into four parts and place two pieces in the middle of a plate ladling two tablespoons of the vinaigrette on and and round the roll. Garnish with sweet Thai chili sauce and peanuts, cilantro/coriander and cucumber.

    Ingredients for Thai Vinaigrette:

    4 Tbsp sake
    4 Tbsp mirin
    1 1/2 cup white sugar
    3/4 tsp chopped garlic
    1 tsp Sambal Olek
    3/4 cup rice wine vinegar
    2 Tbsp fish sauce
    1 Tbsp yuzu juice (or lime juice as a substitute)

    Heat sake and Mirin in a medium pot until hot.  Add sugar and mix until dissolved. Turn off heat and add garlic to hot mixture.  Add Sambal Olek, rice wine vinegar and fish sauce. Remove from heat and cool. Prior to serving, add yuzu or lime juice to finish.  This can be made way in advance and will keep refrigerated for a long time.

    Friday, August 5, 2011

    Braised pork and chorizo sausage stew


    I'd consider this a delicious winter warmer but good God, is it ever tasty!!! I'd eat this anytime with some big thick slices of bread (gluten free of course!) and butter. It's pretty easy to make but you need to start it the day ahead.  Finally, you can take your crock-pot out of the closet and put it to some good use.

    Braised Pork Shoulder

    • 1 small pork shoulder
    • 1 small onion, chopped
    • 1 leek, washed and sliced 
    • 3-4 cloves of garlic 
    • 2 chopped ribs celery
    • 2 chopped carrots
    • Bay leaf, salt and pepper to season
    • Water

    Stew Ingredients:
    • 1 dry-cured chorizo sausage (make sure it's gluten free!) about 8 inches long or about 1 1/2 cups. Cut into thin slices about 1/4 inch thick.
    • 2 cups of braised pork, broken into large chunks (do not shred as the meat will continue to break down in the stew and you want to be left with nice bite size pieces).
    • 1 small onion
    • 1/2 cup white wine
    • 2 Tbsp tomato paste
    • 1 small anchovy - chopped (optional)
    • Approx 1/2 cup of the pork stock (oil removed)
    • 2 - 8 oz cans of good quality cherry or plum tomatoes (preferably organic for best flavour!)
    • 1 - 8 oz can/box of pre-cooked butter beans
    • 1/4 cup chopped flat leaf parsley
    • Lemon

    Day Ahead or Morning Of:

    Pull out the crock-pot. Throw in the braised pork ingredients and season well with salt and pepper.  Cover about half way with cold water and turn on low for the day. Should cook for about 12 hours, until the meat is tender and flakes easily with a fork.   

    Go out and enjoy your day!!!

    Remove the pork and set aside. Strain remaining liquid into a bowl so you are left with a clear broth. Let cool, remove fat and set aside.  

    Making your stew:

    In a deep non-stick frying pan, fry the chorizo over medium to high heat. Once the oils start to release from the sausage, add the onions and anchovy then cook for another three to four minutes until soft. Add white wine and reduce down for about a minute or so.  

    Reduce heat and add the braised pork and toss until the meat is coated in all the tasty goodness. Add canned tomatoes, paste, stock, beans and a little bit of water if necessary. Season with salt and pepper, cover and let simmer for about 20 - 25 minutes. You are looking to meld all the great flavours together and create a rich, yet chunky sauce. Add more water or stock if needed to reach your desired consistency.

    Remove from heat, toss in chopped fresh parsley and finish with a squeeze of lemon juice.


    Wednesday, July 27, 2011

    Ebi Mayo Prawns


    One of my favourite restaurants serve these on their menu but they are pretty expensive.  I was delighted to find the recipe on line and to see that it's actually gluten free!

    I made these for the first time the other night for a party I was hosting.  By the time I had put them down and returned a few minutes later with another appetizer, they were gone.  Apparently, they were good!

    I recommend using large prawns - the photo above shows smaller prawns but I think the meatiness of a larger prawn lends well to the weight of the crispy crust and sauce.  These can be served with tooth picks (smaller prawns), or a fork depending on the size.

    Ingredients
    • 12 ebi (shrimp or prawns), peeled and deveined / or pre-cooked.
    • About a half cup of Japanese sake
    • 5 tbsp or more of corn starch
    • Cooking oil (I used olive oil as it's healthier)

    Ebi Mayo Sauce:
    • 3 tbsp gluten free mayonnaise
    • 1 tbsp milk
    • 2 tsp Ketchup
    • 2 tsp honey
    • Squeeze of lemon


    Preparation:
    Marinate peeled and deveined shrimp in sake for at least one hour.

    Prepare Sauce:
    Combine mayo, ketchup, honey, milk and a squeeze of lemon.  Place in fridge until ready to use.

    To finish the Prawns:
    1. Drain and then toss in corn starch to fully coat.  
    2. Fry approx half of the prawns in pan with about 1/4″ oil until cooked and golden brown (about 2 mins per side). Remove and transfer to paper towel. Pat to remove excess oil.  Repeat with remaining prawns until done.
    3. Toss prawns in enough sauce mixture to lightly coat.  
    Serve hot and enjoy!!!

    Sunday, June 19, 2011

    Baked Herb Goat Cheese Lemon Pots


    I've got party food on the brain.  Maybe it's because it's wedding and baby shower season.  Whatever the case, you can't have too many options when it comes to feeding a group of hungry ladies any time of the year.

    This dip can be made as shown here, or you can simply bake in a small gratin dish with a squeeze of lemon juice if you are strapped for time.  All the ingredients can be made ahead and assembled a day before.  Serves 4.

    • 125g (5 oz) Feta cheese (goat or sheep)
    • 125g (5 oz) fresh goat cheese, softened and at room temperature
    • 2 1/2 tsp fresh thyme, finely chopped; plus 2 or 3 sprigs for garnish
    • 2 Tbsp good quality olive oil, plus more for drizzling
    • 1 tsp lemon zest
    • Freshly cracked black pepper
    • 2 unwaxed organic lemons

    Heat the oven to 350F / 180C.  In a small bowl, mix both cheeses, thyme, lemon zest and olive oil with the back of a fork until well blended.  

    Wash lemons well.  Split in half so you are left with four halves.  Juice the lemons, removing the fruit and juice.  With a spoon, carefully remove the lemon pith while keeping a little left over at the bottom. Carefully cut the bottom ends off the lemon, being careful not to cut into the actual lemon.  

    You want to be left with little pots which will stand up on their own and hold the cheese.  Don't worry if you accidentally cut into the bottom of the pot - the hole can be plugged up with any left over lemon peel or lemon skin.  

    Fill the lemon pots with the cheese mixture and drizzle with a bit more olive oil and finish with black pepper. Bake until the cheese is warm and creamy, about 15 minutes. Carefully remove from the oven and garnish with a sprig of fresh thyme.  

    Allow to cool for a few minutes and then serve on individual plates along side strips of toasted gluten free bread or your favourite gluten free cracker.


    Tuesday, June 14, 2011

    Delicious Ginger Beef


    I associate this dish with dining out and sharing with good friends. It's basically a replica of PF Changs and Joey Tomato's Ginger Beef.  It's easy to make and tastes wonderful.  Serve with brown or white rice.  Reserve the extra sauce for a marinade as it's excellent on chicken or salmon.


    • 1 Beef Flank Steak for Stir Fry (sliced thinly against the grain into approx 1 inch pieces)
    • 1/2 cup corn starch/flour
    • 2 TBSP cooking oil (sunflower or canola)


    • 1/2 cup gluten free soy sauce
    • 1/2 water
    • 3/4 cup brown sugar
    • 1 TBSP finely chopped garlic 
    • 1 TBSP finely chopped ginger
    • 1 TBSP chili flakes (more or less depending on the amount of heat you desire)
    • 1/4 cup thinly sliced carrots (julilenne)
    • 1/4 cup thinly sliced green onions


    To prepare meat, thinly slice the steak along the grain into uniform pieces about 1 inch long. Cover each piece in cornstarch and set aside.

    Working in batches, fry beef in oil until cooked through and crispy.  Don't worry about over cooking as the meat will remain tender. Remove from pan, drain off any excess oil and set aside.

    Add ginger, garlic and chili flakes to frying pan and cook for about one minute (until soft, not burnt!) Add beef and cook for another couple minutes until sauce starts to thicken. If sauce is too runny, add a mixture of about 1 TBSP of cornstarch with 2 TBSP cold water.

    Add carrot and onion, putting aside enough for garnish. Cook for one more minute and remove from heat.

    With a slotted spoon, place beef onto rice, reserving a majority of the liquid in the pan.  The sauce is meant to coat the beef, and not really intended to be used in the dish.

    Serve on top a bed of egg noodles or fragrant basmati rice and garnish with remaining carrots and green onion.

    Monday, June 13, 2011

    Gluten free spaghetti with rapini and mint


    This is one of my favourite Pasta recipes.  I use good gluten free pasta instead of the regular pasta for this dish.  The freshness of the mint and the hit from the chili go well with the broccoli.  The parmesan and soft mozzarella add a creamy dimension and brings the pasta dish together.

    Rapini is an asian form of broccoli.  It's very healthy and can be used in a variety of dishes.  This pasta dish is super easy to make and can be cooked in 10 minutes (as long as you've done your prep ahead of time)  As this dish is made right in the frying pan, I suggest making a couple servings at a time.  Too much pasta may be difficult to work with but if you make it in single or double servings, everyone will get equal quantities of ingredients.

    Pasta:

    Bring a large pot of water to a boil.  Tip:  when making pasta, use one liter of cold water and 1 tsp of salt per serving.  Add salt only after water has started to boil. Stir in a handful of pasta and boil to el dente stage. Strain but do not rinse! Save a bit of the liquid for the sauce as this will help moisten the pasta and create a lovely light sauce.  While the pasta is boiling, get started on your bacon rapini medley.

    Bacon Rapini Medley (enough for two portions)
    • 1/4 bunch rapini, cut into 1 inch pieces, blanched in boiling salted water for about a minute and cooled. Should be bright green in color, firm and not mushy.
    • 1 - 2 rashers of bacon, chopped
    • 2 Tbsp olive oil
    • 1 Garlic clove sliced
    • Pinch of chili flakes
    • 1-2 balls of soft mozzarella (boconcini) diced
    • 1/4 cup grated parmesan cheese
    • Handful of roughly chopped mint

    Heat olive oil on low heat and lightly brown bacon.  Add sliced garlic and chilies and cook for about a minute.  Toss in rapini and then followed by the pasta, cheeses and mint.  Add a few tablespoons of reserve liquid and toss everything to coat.  Remove from heat.  Season with salt and pepper and a squeeze of lemon if desired.

    The cheese will continue to melt once on the plate due to the hot ingredients. Watch for a cool stretching effect off the mozzarella.  This effect makes eating a bit more fun - especially for the kids.  Plus it's a great way to get them eating their veggies.

    Sunday, June 12, 2011

    Gluten Free chocolate cupcakes with green tea buttermilk icing


    These cupcakes were inspired from a local cafe just outside of Banff National Park in Canada.  The chocolate and green tea icing go really well together, however you can use any type of icing you'd like.  Omit the green tea powder and you have a wonderful vanilla icing.  The cupcakes themselves are super moist and light - but more importantly...delicious!

    P.S. I've converted the measurements from a UK recipe so I am hoping the conversions work!

    Cupcakes
    • 3/4 cup + 2 Tbs (90g) Green and Blacks Organic Cocoa powder
    • 1 1/3 cup (350ml) boiling water
    • 3 eggs 
    • 1 Tbsp vanilla 
    • 3 cups (300g) gluten free flour
    • 2 1/4 cups (430g) sugar 
    • 2 tsp baking powder
    • 1 tsp baking soda
    • 1/4 tsp Xanthan Gum 
    • 1/2 tsp salt
    • 1 cup (230g) unsalted butter 

    Preheat oven to 350C/180F.  Line 2 x 12 muffin trays with paper liners and set aside.

    In a bowl, mix together cocoa powder and boiling water.  Mix well removing any lumps.  Set aside and allow to cool.

    Beat together butter and sugar until well blended.  Add eggs one at a time and beat on high heat until smooth.  Add chocolate mixture and continue to mix well.  In another bowl, mix all dry ingredients together and slowly fold into wet ingredients. Mix on high speed for a couple minutes until batter is light and fluffy.

    Spoon batter into cupcake liners until 3/4 full.  Bake for about 20 - 25 minutes until cooked.  Insert a toothpick into the centre.  If it comes out clean, they are done. Allow to cool on a cookie rack.


    Icing:
    • 3 cups confectioners' sugar
    • 1 cup butter
    • 1 teaspoon vanilla
    • 1 to 2 tablespoons whipping cream
    • 1 to 2 tablespoons matcha tea (japanese green tea powder found in most asian food stores)

    Mix together sugar and butter. Mix on low speed until well blended and then increase speed to medium and beat for another 3 minutes.

    Add vanilla and cream and continue to beat on medium speed for 1 minute more, adding more cream if needed for spreading consistency. 

    Sunday, May 22, 2011

    Gluten Free Spicy Thai Pork Wraps


    Sorry it's been so long since my last post.  Sum it up to my dad passing away, getting a new job and moving into a new home.  But no worries!!! I have a bunch of great new gluten free recipes ready to go, and now with summer upon us, there will be more opportunities to take those lovely food shots that go so well with the recipes.

    ***

    These are delicious, hearty wraps with a kick.  The pork meatballs are packed full of flavour and marry well with sweet crunchy veggies and creamy chili sauce.  They can be made as a sandwich or as a wrap.  Just use the gluten free bread of your choice.  Serves four (4).


    Hot Chili Mayo:

    • 1/3 cup mayonnaise (low fat or regular)
    • 1/3 cup plain yogurt (low fat or regular)
    • 2 green onions, finely chopped
    • 1 tablespoon hot chili sauce (such as sriracha or Franks Red Hot)

    Meatballs:
    • 1 pound ground pork
    • 1/4 cup finely chopped fresh basil
    • 4 garlic cloves, minced
    • 3 green onions, finely chopped
    • 1 tablespoon fish sauce 
    • 1 tablespoon hot chili sauce (such as sriracha or Franks Red Hot)
    • 1 tablespoon sugar
    • 2 teaspoons cornstarch
    • 1 teaspoon freshly ground black pepper
    • 1 teaspoon coarse kosher salt
    • 1 tablespoon Asian sesame oil (for frying)

    Wraps:
    • 2 cups julienne carrots
    • 2 cups julienne cucumber
    • 1/4 cup unseasoned rice vinegar
    • 1/4 cup sugar
    • 1 teaspoon coarse kosher salt
    • Thinly sliced jalapeño chiles (fresh or tinned)
    • 16 large fresh cilantro sprigs

    Hot Chili Mayo:
    Stir all ingredients in small bowl. Season with salt. do ahead Can be made 1 day ahead. Cover and chill. 

    Veggie:
    Toss first 6 ingredients in medium bowl. Let stand at room temperature 1 hour, tossing occasionally.

    Meatballs:
    Gently mix all ingredients in large bowl. Using moistened hands and scant tablespoonful for each, roll meat mixture into 1-inch meatballs. Arrange on baking sheet.  Can be made 1 day ahead.  Cover and chill until ready to cook.

    Preheat oven to 350°F.   Heat sesame oil in large skillet over medium-high heat. Add half of meatballs. Sauté until brown turning meatballs often and lowering heat if browning too quickly, about 10 minutes. 
    Repeat with remaining meatballs.

    Transfer meatballs to another rimmed baking sheet. Place in oven and let bake until done for about 15 to 20 minutes. The meatballs should be cooked through.


    Wraps/Sandwiches:

    You can use a variety of different gluten free breads.  I used a rice tortilla shell which was lovely.  If using wraps, be sure to warm in the oven before using so they fold nicely.  If not, you can use a variety of different types of gluten free breads such as buns, pita bread or regular sandwich bread.  

    Fill each with 1/4 of meatballs. Drain pickled vegetables; place atop meatballs. Finish will a good dollop of the hot chili mayo mixture and cilantro.